Enjoying Outside, Inside - Homemade Paper

Kristie Ehrhardt • April 10, 2022

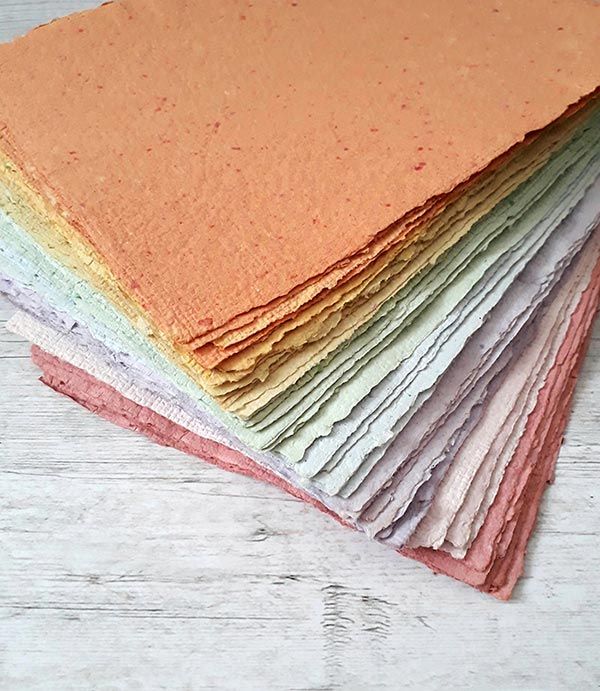
Homemade paper by VeraViglie.com

You may recall learning that the first paper products were made from the pith of a sedge called papyrus (Cyperus papyrus). The first known use of papyrus was in Egypt as papyrus was plentiful in the Nile Delta. Papyrus was also used for other products such as reed boats, sandals, baskets, ropes and mats.


You can make your own paper using papyrus if you happen to visit Egypt or the Mediterranean region but you can also make paper using your own recycled pieces of office paper, colored construction paper or tissue paper, anything that isn’t shiny (like magazines) or waxy (like tootsie roll wrappers). You can even add flower petals, seeds or leaves from your own garden to add bits of color and texture to your paper!


To get started, you’ll need to have a few things on hand:


-a mixing bowl


-a mould and deckle (more on those in a second) or screen covered frame


-a blender


-recycled office, tissue or other paper


-water


-a plastic vat (a bit larger than your mould and deckle, a plastic dishwashing tub usually works well)


-sheets of newspaper, felt, towels or other absorbent material


-a sponge


-confetti, flower petals, leaves, seeds, glitter, bits of colored thread, etc. to add color and texture (optional)


A mould and deckle aren’t hard to make but you can also purchase them here or here if you prefer that. For instruction on making your own mould and deckle, visit here.


To begin making your own paper you’ll first need to make the pulp which involves a blender, water and recycled paper. You can use your kitchen blender but you might not want to use it to make smoothies after you’ve used it to make paper. If you get really serious about paper making, you can purchase a professional blender designed especially for blending pulp for paper making.


First take a couple sheets of paper and tear them into smaller pieces and soak them in the mixing bowl for a few hours to overnight, this step makes it a bit easier on the blender. Once the paper is soaked, fill your blender about three quarters full of water and throw in a couple of sheets worth of the torn and soaked paper. To get different colors and textures you can experiment with different colors and types of paper. Turn the blender on low working your way up to high speed.  Keep blending until it sounds pretty uniform but do stay nearby to make sure the blender isn’t sounding strained which may mean that the paper is wrapped around the blades. Once it’s smooth, you’ll need to dump the beaten pulp into the vat (plastic tub); if you don’t plan on finishing your paper right away, you can store the pulp in a bucket for a few days but don’t wait too long as it can get a little funky.


When you are ready to make your paper dip your mould or screen covered frame (whichever you are using) into the vat of pulp a few times, tipping and shaking it to spread the paper slurry out into an even thickness. Before you do this, you can add whatever you like to your paper to add texture and color. Lay the mould on something absorbent and blot off as much of the excess water with a sponge or an absorbent material. Flip it over on to a hard, flat surface covered with felt, if the paper mixture doesn’t readily come out, try drying the back of the screen some more, tap it or gently peel the paper off. You can make imprints in the wet paper if you’d like to by pressing leaves, lace or anything you’d like into it and leaving it in place until the paper is completely dry. Cover the other side of the paper with another piece of felt and roll with a rolling pin to help bind the fibers together and flatten the paper. Sandwich the pieces of paper between pieces of felt and keep them under a heavy book or cutting board to keep them flat. Let them dry thoroughly, this may take a day to several days and then it’s ready to use!


Here are a few articles and tutorials if you’d like to see more detailed instructions and different techniques.


https://www.thesprucecrafts.com/make-unique-handmade-paper-by-recycling-2905566


https://www.artsy.net/article/artsy-editorial-crash-course-basic-papermaking


https://www.paperslurry.com/2014/05/19/how-to-make-handmade-paper-from-recycled-materials/


-Kristie Ehrhardt; kehrhardt@tuleyome.org


Tuleyome Land Conservation Program Manager


RECENT ARTICLES

By Kristie Ehrhardt April 9, 2026
Have you ever been hiking in the Berryessa Snow Mountain National Monument (or almost anywhere else in the world for that matter) and come across a plant or animal and not been able to identify it? Have you ever thought, “hmmm, if only there was an easily accessible phone app that could help me identify this thing nearly instantly?” If that exact thought wandered through your cranium; boy, oh boy are you in luck! Enter iNaturalist! The iNaturalist app is primarily an online social community sharing their findings and information to network and help others learn about the environment. The iNaturalist website states that “INaturalist is crowdsourced species identification system and an organism occurrence recording tool. You can use it to record your own observations, get help with identifications, collaborate with others to collect this kind of information for a common purpose, or access the observational data collected by other iNaturalist users.” iNaturaist was developed as a Master’s final project by Ken-ichi Ueda, Nate Agrin and Jessica Kline at UC Berkeley’s School of Information back in 2005; the same year that YouTube and Reddit were initially introduced to the public - a vintage year for social media developments! It officially launched in 2008 and work continued on the site and iNaturalist, LLC was born in 2011. By 2017 National Geographic was onboard and in 2023, what began as a student project became an independent nonprofit organization that grew into a globally recognized Citizen Science driven platform that connects millions of people to the biodiversity around them. iNaturalist is a compilation database that contributes valuable collective intelligence to conservation and science from around the world. iNaturalist is a valuable tool for species identification as well as organism occurrence crowdsourced information, it is also a practical resource for species identification and distribution. And guess what else! It’s free to use. Sound good? Want to know how you can benefit from iNaturalist? You can use iNaturalist to record your own species observations and locations. You can use it to help identify species you aren’t sure about or may be new to by using other individuals' entries. You can even work with other users to collaborate and continue to add information to the site or you can access other’s information regarding species observations and occurrences. You can look up and enter data using scientific nomenclature or common names. You can look at other’s photos and locations for reference and contribute your observations. Students and Professors alike are using and recommending iNaturalist. So how’s it been going? On March 20, 2008, the very first entry was made into iNaturalist. To save you from doing the math I’ll tell you that iNaturalist just had its 18th birthday! Guess how many observations people have recorded in those 18 years… you’ll never guess so I’ll just tell you - iNaturalist has over 3.5 million individual observations ! And it’s increasing every moment, you can literally watch the counter on their homepage rise. Guess how many individual species have been recorded! Not to be disparaging but you’ll never get it...iNaturalist is up to just under 560,000 species ! There are currently over four million registered individuals making and recording observations and more than 483,000 people helping other people by making identifications. In just 18 years, a student project has grown into a globally recognized and respected tool to make and record species observations adding information to a world-wide biodiversity database. If you want to be a part of this community simply download the iNaturalist app or go to their website and get out there and start entering your observations. The Berryessa Snow Mountain National Monument region is an incredible place to practice using iNaturalist because it hosts such a huge diversity of habitats and species.
By Kristie Ehrhardt April 9, 2026
I’m sure a lot of us already know the danger that foxtails pose to our dog and cat friends and hopefully nobody reading this minds, but I’d like to try extra hard to make sure that everyone reading this knows about the menacing nature of foxtail barley. Foxtail barley ( Hordeum sp.) is a member of the grass (Poaceae) family and is native (I just learned this!) to North America. Although it is a native species, it is considered “weedy” because it readily establishes and can outcompete other species because it thrives in both moist and drought prone environments. It is also known by other cute little woodland creature names such as squirreltail barley, bobtail barley and skunktail barley but lemme tell you, it’s not as endearing as the common names suggest. The name “foxtail” is a general term for grasses in the Hordeum (barley genus). Foxtail barley (foxtail) is a perennial bunch grass that thrives in previously disturbed areas and is somewhat unique in that it is tolerant of saline and/or alkaline soils where the majority of other upland species cannot survive. Foxtails can germinate in the spring or the fall and those that germinate in the fall resume growing early the following spring often outcompeting other spring germinating plant species. Because it is salt tolerant it can be found on coastal beaches and along the edges of brackish and salt marshes as well as road sides, yards and fields. Foxtail usually doesn't exceed one three feet tall when left undisturbed but if the plants are mowed, they can flower and produce seed much closer to the ground as well. Seed heads are pale green and appear as a square-shaped (characteristic of barley) bushy spike. The stems are erect with soft blue-ish gray-green rolled leaves and seed heads have long awns. Since plants can’t get up and wander about, they need a method to disperse their seeds. That method for foxtails is mainly by hitchhiking on other things that move from one location to another. Up close, individual seeds look like a fox’s bushy tail and their shape helps them to attach to your pets and you. And because the seeds are barbed, they can get embedded in our furry friend’s ears, eyes and skin and often requires a vet’s steady hand (and your pocketbook) to remove them. They can be especially dangerous and sometimes fatal if they get into your pets nose or blood stream. Right now, at least for a few more days, the foxtails are still green and soft. But, as the temperatures rise and the vegetation begins to dry out, the hazards posed by foxtails begin to rise with the mercury. As the seed heads mature they become golden in color and very fragile. This is when they are the most dangerous to our pets as they are easily broken apart from the plant. Eventually the seeds get harder and drop to the ground where if stepped on they can embed themselves into your bare feet or your pet’s paws. Although it seems nearly impossible to avoid foxtails there are some ways to help you and your furry buddy continue to enjoy hiking through the Berryessa Snow Mountain National monument or a leisurely stroll through your neighborhood. Avoid areas where you’ve seen foxtails before and pay attention to where your friend wanders - especially during the summer months when the foxtails are dry and brittle Keep your dog’s fur trimmed and short so there’s less surface for the seeds to attach to Do a quick nose to tail check for foxtails after each walk or hike being sure to check between their foot pads A basket muzzle may help keep their nose and mouth clear of foxtails while still allowing your pup to pant If your furry friend is coughing, gagging, sneezing, snorting or pawing at their face or ears or limping, there may be an embedded foxtail that you aren’t able to see. It’s best to have them checked out by a vet to make sure they are all clear. If they have picked up a foxtail, removing it as soon as possible is usually less invasive for your companion and your wallet. Just by spending a little extra time and effort, you and your pets can still Enjoy Outside even during foxtail season!
By Kristie Ehrhardt April 9, 2026
Finally, they’re back!! I’ve been waiting and watching for them and just this week I heard the first one of the summer. Swainson’s hawks ( Buteo swainsoni ) make an impressive journey every fall and then do it again in reverse every spring. Where do they go and why is it so impressive you ask? Stay tuned and find out! Our Swainson’s hawks, the hawks that summer here in California’s Central Valley, that raise their babies in old cottonwoods and valley oaks along our riparian areas, the same hawks that weigh less than two pounds and gorge themselves on grasshoppers and rodents all summer long, travel all the way to ARGENTINA! That is nearly 6,500 air miles and would take 18-20 hours on a commercial flight without any layovers. Are you impressed? If not, consider the fact that they do that epic journey TWICE a year! Swainson’s hawks are a close relative of our year-round resident, the Red-tailed hawk and are similar in size and habitat requirements. Swainson’s hawks have two color morphs; a light morph and a dark morph, and although both sexes wear the same colors and patterns, females are typically slightly larger and heavier than males. In the light color morph both females and males sport a chocolate-colored “bib” with a white throat and face patch and bright yellow rostrum. Their tails are barred and their flight feathers are dark with a light-colored leading edge - a unique color pattern in North American raptors. Dark morphs are all dark chocolate brown with the same barred tail with a light patch just under it. Swainson’s hawks occur roughly west of the Missouri River during the warm summer season and like some people I know, take off for warmer regions when the summer weather turns chilly. In California, Swainson’s hawks nest primarily in the Central Valley although there are small populations in northeastern California, Shasta Valley, Owens Valley and the Mojave Desert. Historically it was estimated that California supported over 17,000 breeding pairs but in 1980 that number had declined to only 375 breeding pairs. In 1988 it was up to an estimated 550 breeding pairs statewide and in 2005 the number of breeding pairs had inched up to just under 2100. They were listed as a threatened species in California in 1983 due primarily to habitat loss.  An endorsement of their adaptability, Swainson’s hawks have not only learned to co-exist with many agricultural practices but they in fact thrive alongside irrigated pastures and tractors which has helped their number improve. Swainson’s hawks have learned that the rumble of a tractor pulling a harrow disk equates to what we might consider a drive through meal. They’ve also learned that when a rancher turns on the water and begins to flood irrigate a pasture, that advancing waterline flushes out underground rodents resulting in a heavenly smorgasbord of unwelcome pests to the human behind the water controls. I’ve seen 20 hawks lined up following the waterline with 20 more circling waiting their turn at the chow line. If their migratory journey hasn’t impressed you, their rodent/lizard/grasshopper eating capacity surely will. These gourmands will gorge themselves so heavily that they realistically cannot lift themselves off the ground for a time which results in oodles of hawks hopping about like unathletic feathered toads. Mutualism at its finest - the hawks get a gourmet meal and farmers and ranchers get free pest control. If their stamina and gluttony doesn’t impress you, maybe this will. It’s not uncommon for wild Swainson’s hawks to live and continue breeding into their 20’s. But that’s not just hanging around and raising babies in the laid back summer months. During those 20 years, that individual bird has flown about 260,000 miles to safely return to the same area, perhaps the same tree, that held the nest that it fledged from. That’s undeniably impressive!